Expressions, Loops and Arrays
In our previous lesson we learnt all about JavaScript variables, functions and objects. In this tutorial we will be diving a little deeper, exploring expressions, loops, arrays and the DOM.
Before we start…
Download the files required to begin working through the tutorial from here.
In the first half of this tutorial we will be using the files lesson2.html and script.js, then files london.html and london-script.js for the second part.
Values
In the first tutorial, we learnt all about values.
Strings:
var name = 'codebar';

console.log(name + ' is amazing!'); // this is an expression
Numbers:
var pi = 3.14;

console.log('The value of pi: ' + pi);
and Objects:
var person = {
  first_name: 'Archibald'
};

console.log('Hello ' + person.first_name + '!');
We are now going to introduce one more important type: booleans. A
boolean can only be true or false, for example:
var codebarIsAwesome = true;
var weatherIsAmazing = false;

console.log('Is codebar AWESOME? ' + codebarIsAwesome);
console.log('Is the weather in London amazing? ' + weatherIsAmazing);
Expressions
Maths
In the first tutorial, we learnt about expressions using the + operator. The
other basic math operators are -, *, and /:
var x = 6;
var y = 3;
var addition = x + y;

console.log('Addition: x + y = ' + addition); // Addition: x + y = 9

var subtraction = x - y;

console.log('Subtraction: x - y = ' + subtraction); // Subtraction: x - y = 3

var multiplication = x * y;

console.log('Multiplication: x * y = ' + multiplication); // Multiplication: x * y = 18

var division = x / y;

console.log('Division: x / y = ' + division); // Division: x / y = 2
Why not try some other maths problem using the
xandyvariables?
More maths
Other useful math operators are %, **, ++ and --:
The modulus
%operator returns the remainder when dividing one operand by another.
The exponentiation
**operator returns the result of raising the first operand to the power of the second.
The increment
++and decrement--operators return the result of adding one and subtracting one from an operand respectively.
var x = 5;
var y = 3;
var modulus = x % y;

console.log('Remainder: x % y = ' + modulus);

var exponentiation = x ** y;

console.log('Exponentiation: x ** y = ' + exponentiation);

var increment = x++;

console.log('Increment: x++ = ' + increment);

var decrement = y--;

console.log('Decrement: y-- = ' + decrement);
Comparisons
The === operator compares two values, it returns the boolean true if they are equal and false if they are not.
var apples = 'apples';
var oranges = 'oranges';

var equal = apples === oranges;

console.log('Apples and oranges are the exactly same: ' + equal);
The opposite of === is !==. It returns true if they are not equal, and false if they are.
var apples = 'apples';
var oranges = 'oranges';

var notEqual = apples !== oranges;

console.log('Apples and oranges are different: ' + notEqual);
You may also see
==and!=, these are similar but have some quirks so it’s generally recommended to avoid them. It is safer to use===and!==as they will always do what you expect.
The > and < operators are “greater than” and “less than”. You can
use them to tell which of two numbers is bigger.
var coaches = 20;
var students = 24;
var pizzas = 25;

var moreStudents = students > coaches;
console.log('Are there more students than coaches?' + moreStudents);

var lessStudents = students < pizzas;
console.log('Are there fewer students than pizzas?' + lessStudents);
Play around with changing the
coaches,studentsandpizzasvariable numbers to familiarise yourself with operators.
You can also combine operators.
var enoughPizzas = (coaches + students) < pizzas;
console.log('Do we have enough pizzas for everybody? ' + enoughPizzas);
Now sit with your coach and create 2 variables, one is your age and one is the minimum driving age. Then console log whether you are old enough to drive.
If statements
An if statement lets you run a piece of code if an expression is true.
var codebarIsAwesome = true;

if (codebarIsAwesome) {
  console.log('codebar is AWESOME!');
}
Change the
codebarIsAwesomevariable to false, what happens now?
You can use an expression inside an if statement.
var coaches = 20;
var students = 24;
var pizzas = 25;

var totalPeople = coaches + students;

if (totalPeople > pizzas) {
  console.log('We have more people than pizzas!');
}

if (students > pizzas) {
  console.log('We have more students than pizzas!');
}
You can add an else block to run some code if the expression is false.
if (totalPeople > pizzas) {
  console.log('We have more people than pizzas.');
} else {
  console.log('We have waaay too much pizza. That can never be bad! :)');
}
Ternaries - Additional learning
You may also see if/else statements written slightly differently.
The condition followed by a question mark (?), then an expression to execute if the condition is truthy followed by a colon (:) and finally the expression to execute if the condition is falsy.
condition ? expression1 : expression2
Using the people and pizza example we wrote above and using the Ternary Operator instead of if/else it would look like this:
totalPeople > pizzas
  ? console.log('We have more people than pizzas.')
  : console.log('We have waaay too much pizza. That can never be bad! :)')
Loops
A loop is used to execute a set of statements repeatedly until a condition is met.
The while loop
The while loop is the simplest and most general loop in JavaScript. It looks a bit like an if block, and just like an if block, the stuff in the round brackets is a test.
while (test) {
    // Do some stuff.
}
When the while loop starts, the test is checked. If it is false, then the while loop is skipped. If the test is true, then like an if block the statements in the curly braces are executed.
The difference is what happens after the statements in the block. With an if, everything is finished and the statements below the if block are executed. With a while, we go back up to the test. If the test is still true, the statements in the block are executed again, and so on until the test is false. This is why we call it a loop.
For example, if we wanted to set a timer on an online ticket outlet, we could count the timer down and while it hasn’t reached zero, the option to buy the ticket could still be available.
We can use this to sum all numbers from 1 to 10:
var i = 1;
var total = 0;

while (i <= 10) {
  total = total + i;
  i = i + 1;
}

console.log('Total: ' + total);
We can also express
<= 10using< 11
You can read this as:
- Start with variables
i = 1andtotal = 0. - While
iis less than or equal to 10: - Add
itototal, and updatetotalwith the result. - Add
1toi, and updateiwith the result (incrementi).
Since the value of i goes up by one at the end of each loop iteration, eventually (when i is 11) the test will be false, and the while loop stops.
The for loop
The for loop offers the same behaviour as a while loop, but arranged in a way that is often more convenient. It’s very common in loops to have a counter (as there was in the case above), and the for loop caters especially for this.
for (/* before loop starts */; /* test before each iteration */; /* after each iteration */) {
  //set of statements
}
The stuff in the round brackets is split into three parts by ;. The first part is used once, before the loop begins. It’s a good place to set an initial value for a counter (like x = 1 in the while loop example).
The second part is a test, and like in the while loop it is checked before each iteration.
The third part is executed after each loop iteration. It’s useful for incrementing the loop counter.
For example, if we had an online shopping basket, we could loop over the items in the basket and add up the cost to a total using a for loop. The initial value can be zero, the second part can test that there are still items left to be added up and the third part can increment to the next item. The code that is run on each iteration can add the cost to a shopping basket total.
The while loop above can be rewritten as a for loop:
var total = 0;
var i;

for (i = 1; i <= 10; i = i + 1) {
  total = total + i;
}

console.log('Total: ' + total);
Another way to write the for loop is
for (var i = 1; i <= 10; i++). Thei++is a short way of writing “increase i by one”.
Even though while loops are simpler than for loops, it is more common to see for loops. This is because loops are often used to do something with arrays, which are introduced in the next section.
Arrays
An array is a simple data structure. It can hold a list of elements of the same or different types (e.g. strings, numbers, booleans). In an array each element can be accessed using the index.
Confusingly, the first index of an array in JavaScript is 0, not 1.
To understand this better, let’s create an array of strings.
var animals = ['dog', 'cat', 'rabbit', 'horse', 'elephant', 'monkey'];

To retrieve an item from the array, we use square bracket notation
To get the first item animals[0], the second animals[1] etc.
Create an array that includes 5 names and then access the 3rd item in the array. (don’t forget to access the third item in the array you won’t be doing [3])
Properties - length
The length property returns the size of the array
animals.length
The length property is extremely useful when you want to do something with every element in an array. For example, to log each entry of the animals array, you can use animals.length with a for loop:
var i;

for (i = 0; i < animals.length; i = i + 1) {
  var animal = animals[i];
  console.log(animal);
}
Note that we go up to, but do not include animals.length as an index. This is because arrays are indexed from zero, so the last index is always one less than the length.
Methods
The word method is usually used to mean a function that belongs to an object. It’s common to see them used with the dot notation.
Adding objects to an array
array.push(object) adds an element to the end of the array
array.unshift(object) adds an element to the beginning of the array
var animals = ['dog', 'cat', 'rabbit', 'horse', 'elephant', 'monkey'];

animals.unshift('cow');
animals.push('zebra');

console.log(animals);

// Expected output: ['cow', 'dog', 'cat', 'rabbit', 'horse', 'elephant', 'monkey', 'zebra']
Removing objects
array.pop() removes and returns the last element
What do you expect to get when apply
pop()to the animals array? Try it out.
Analogously, array.shift() removes and returns the first element of the array.
Ordering
To order the elements of an array we can use sort().
animals.sort();
Try this out on an array of strings.
var names = ['Jane', 'Barry', 'Helen', 'David', 'Sam'];

names.sort();

console.log(names);
What happens when you add the operator
reverse()like soanimals.sort().reverse();
sort takes the array and sorts the items in a kind of alphabetic order (but be careful of capital letters and special characters). sort can be (and usually is) customised to sort things in any way you like. It can take a function as an argument to tell it what to do. For example:
function sortNumbersAscending(a, b) {
    return a - b;
}

var nums = [1, 5, 3, 19, 2, 10];

nums.sort(sortNumbersAscending);

console.log(nums);
Sort passes pairs of entries from the array to sortNumbersAscending. If sortNumbersAscending returns a number less than zero, then sort knows that a should come before b. If the number is greater than zero, then b should come before a.
// Sort numbers descending.
nums.sort(sortNumbersAscending).reverse();
Can you write a function called
sortNumbersDescendingthat can be used in place of.sort(sortNumbersAscending).reverse()?
Loops again!
Now that we know what arrays are, we can use that to understand loops better. Let’s try out another example:
var fruitAndVeg = ['apple', 'orange', 'banana', 'kiwi', 'avocado', 'celery', 'aubergine'];
var noAvocados = [];
var i = 0;

while (i < fruitAndVeg.length) {
  if (fruitAndVeg[i] !== 'avocado') {
    noAvocados.push(fruitAndVeg[i]);
  }
  i = i + 1;
}
Can you understand what this loop is doing? Try to explain it to your coach.
There is a counter here though, so a better way to write this would be:
var fruitAndVeg = ['apple', 'orange', 'banana', 'kiwi', 'avocado', 'celery', 'aubergine'];
var noAvocados = [];

for (var i = 0; i < fruitAndVeg.length; i = i + 1) {
  if (fruitAndVeg[i] !== 'avocado') {
    noAvocados.push(fruitAndVeg[i]);
  }
}
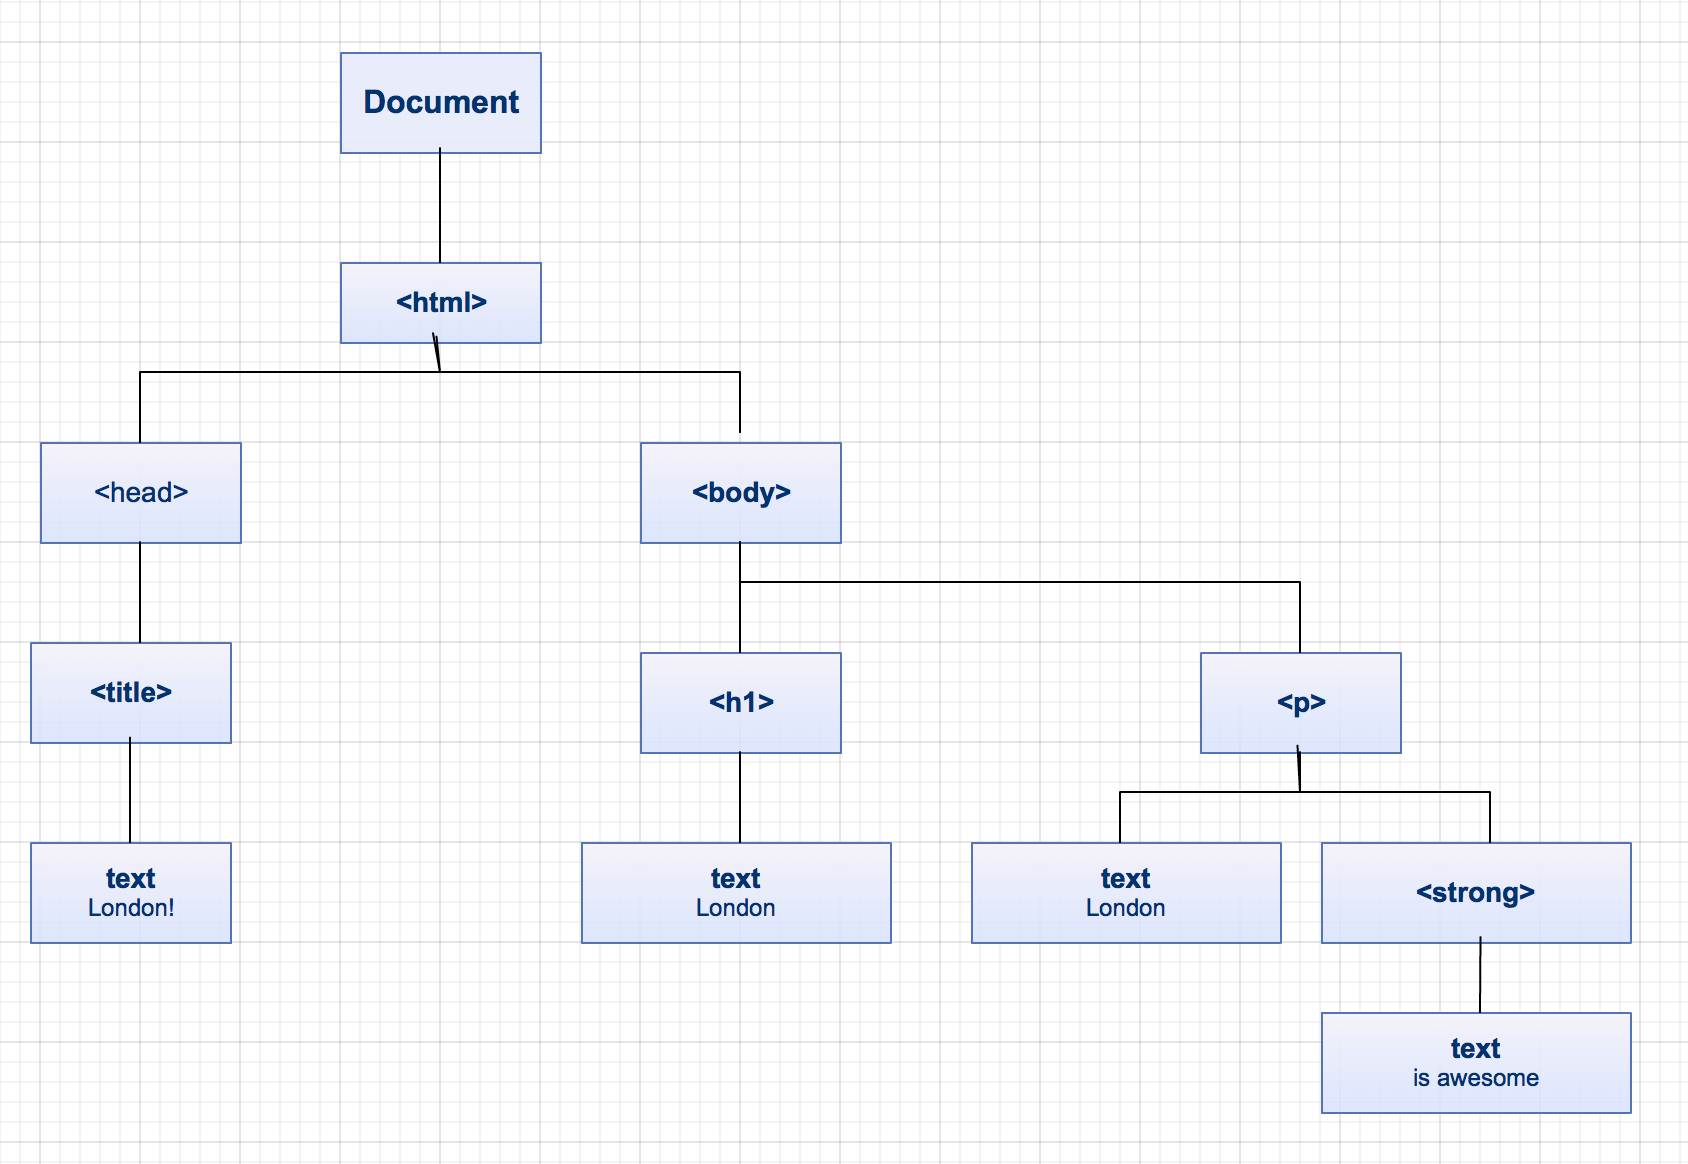
The DOM
What is the DOM?
DOM stands for Document Object Model.
When the HTML is loaded on our page, the browser generates its DOM. This enables us to access and interact with HTML elements using JavaScript.
DOM representation
<html>
  <head>
   <title>London!</title>
  </head>
  <body>
   <h1>London</h1>
   <p>
     London <strong> is awesome</strong>
   </p>
  </body>
</html>
Interacting with the DOM
The DOM is represented by nodes. Each node has different properties, and nodes are connected (like in the tree diagram above).
Let’s try interacting with the DOM of our page by getting the parent node of the body.
Try this using the console on the inspector. As the script gets loaded before the body, the element will not be there if you try adding this to the script.js
console.log(document.body.parentNode);
To get around this issue, we will be wrapping our called in functions triggered by the interface.
Write a function that lists all DOM children elements.
function listDomElements() {
  var children = document.body.childNodes;
  var i;

  for (i = 0; i <  children.length; i = i + 1) {
    console.log(children[i]);
  }
}
and add a link that triggers the function
<a href="#" onclick="listDomElements()">List DOM elements</a>
Awesome!
But interacting with DOM doesn’t need to be this complicated.
An easier way of interacting with the DOM is by retrieving elements using their tag.
document.getElementsByTagName('h1');
That’s not very easy though, as it’s likely that you will have multiple paragraphs, divs, links or other elements.
The most common way, is by retrieving elements by id.
Add an id descriptionto the paragraph element.
var description = document.getElementById('description');
console.log(description.innerHTML);
Modifying the HTML
Steps for creating new elements
There are three main steps we need to follow to achieve this.
- creating an element
document.createElement('<tagName>'); - creating text nodes
document.createTextNode('<text>'); - adding children to elements
document.appendChild('<node>');
Try this out using the london object we declared previously
var london = {
  name: 'London',
  population: 8308369,
  tallestBuilding: {
     name:  'Shard',
     height: '310m'
  },
  numberOfUniversities: 43,
  averageRent: 1106,
  dailyTubePassengerJourney: 3500000,
  olympics: [ 1908, 1948, 2012],
  updatePopulation: function(newPopulation) {
    this.population = newPopulation;
  }
};
Display the population
function displayPopulation() {
  // Make a new <p></p> for population. This is not attached to the DOM yet.
  var paragraph = document.createElement('p');

  // Make some text content to put into your <p></p>
  var content = document.createTextNode('Population: ' + london.population);

  // Put the text content into the <p></p>.
  paragraph.appendChild(content);

  // Finally the population can be appended to the body, and will become visible in the browser.
  document.body.appendChild(paragraph);
}
Don’t forget to add a link that calls the function.
Create functions that load all the individual information we have stored about London. If you are having trouble ask for help from your coach.
When you are done with this, try creating one main function that does the calls. Use the JavaScript
onload()event on the body, similar to how we used theonclick()event previously, to add the information to the page.
Bonus
Modify the JavaScript file we used in the first part of the lesson, and its HTML page so that you can load the information on the page instead of the console.
Remember to wrap your code in functions!
This ends our Beginning JavaScript. Is there something you don’t understand? Try and go through the provided resources with your coach. If you have any feedback, or can think of ways to improve this tutorial send us an email and let us know.
Further Learning
If you want to learn how to Build a Random Phrase Generator in JavaScript, then watch this video on our YouTube.