Set-up Git and GitHub
PREREQUISITES:
- Understanding of version control (Introduction to Version Control and Git)
Introduction to Git and GitHub
Now that we know what Version Control is, let’s get set-up with Git and Github. By the end of this tutorial we’ll have installed Git, set-up a Github account, created SSH keys that we can use to authenticate between the two, then finally created and cloned a repository for us to start working on our own projects and contributing to others.
Install and Set-up Git
Install command line Git for your operating system (OS X, Windows or Linux) and open a terminal / command prompt.
Once installed check Git commands works by typing the following in the terminal window.
$ git --version
This will return the version of Git you’ve installed and prove it’s up and running correctly.
Create an empty Git repository
Now create a directory where you will be storing all your projects, by typing the following lines and hitting enter after each. You can call the directory whatever you prefer, such as code or projects.
$ mkdir practising-git
$ cd practising-git
$ git init
The first command above will make a new directory (
mkdir) at the system location you’re at within the terminal window. The second command will change directory (cd) into the new one you just made. The third command will call the Git program then initialise (init) your directory as a local Git repository
Set-up your Git account details
When we make a commit to a respository we need to associate it with ourselves. To do that we can tell Git our Github account username and email address. Type the following lines in the terminal window.
$ git config --global user.name "Your Name"
$ git config --global user.email "name@domain"
Set-up a SSH keys
In order to connect to and work with the host of a remote repository you’ll need a way to prove who you are before a secure connection is allowed. If you think you may already have SSH keys set-up or just want to see what you have in place, use the following command.
$ ls -al ~/.ssh
Notice this is a command line statement, not a Git statement. In the consoole window look for files named
id_rsaandid_rsa_pub
There are two files to be generated as one is the Private Key that resides on your system and the other is the Public Key that can be shared and added to various services, such as Github, as the other part to authenticate you with.
# Generate SSH Key Pairs
Open a terminal window and enter the following command.
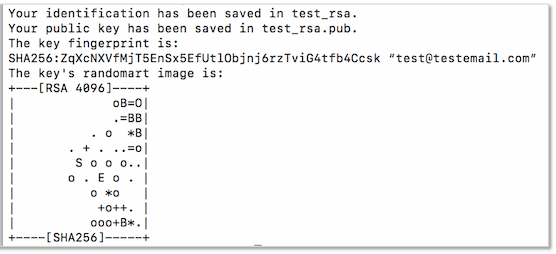
ssh-keygen -t rsa -b 4096 -C "[email protected]"
When prompted to Enter file in which to save the key, just hit [ENTER] on your keyboard to accept the location shown. If there are already keys in that location you’ll be asked if you want to overwrite them. Hit y or n as appropriate.
You’ll then be asked to Enter passphrase and to reconfirm it - choose a secure one - then hit [ENTER] after each prompt and the keys will be generated, along with your password and email as a label.
# Add SSH Keys to the ssh-agent
To avoid having to provide a password every time we connect to a service we can use the ssh-agent on our system. This agent handles passwords for ssh private keys and connections to the remote service we’re logging into. This avoids having to send passwords over the network to the service.
Check if the ssh-agent running by typing the following command
eval "$(ssh-agent -s)"
This should return the PID for the ssh-agent which means it has been started in the background.

Now add the ssh keys to the ssh-agent by typing one of the following depending on your system.
Windows:  ssh-add ~/.ssh/id_rsa
    Mac:  ssh-add -K ~/.ssh/id_rsa
The -K option is Apple’s version of
ssh-addwhich adds the passphrase to your keychain for when you add the key to the ssh-agent
You can check what identities have been added to the ssh-agent by typing:
ssh-add -l
Set-up and Connect to a Github Account
Now that we have Git working on our local system and the SSH keys we’ll need in order to connect to a remote service, let’s set-up the Github account so we can then finish connecting the two.
Sign-up for a Github Account
Navigate to https://github.com/ and from the home page sign-up for an account.
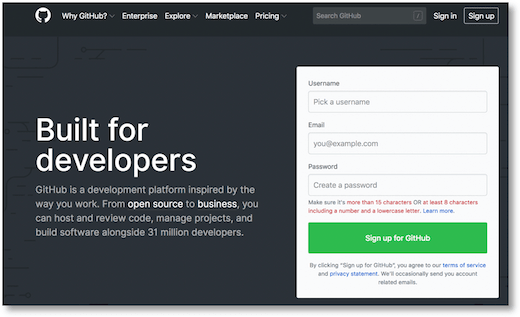
Be sure to choose the free pricing plan.

Once you’ve verified your email address the account will be active and you can go back to edit your profile later on.
Add the SSH Key to Github
Now we have both Git and the SSH keys set-up on our local system and a Github account created so we can have access to hosted repositories, we need to link them together using the SSH keys.
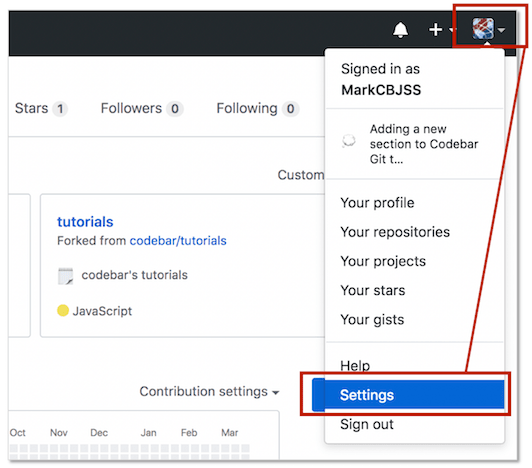
Navigate back to github.com and ensure you’re signed-in to your account. Then in the top right corner click on your profile photo and select settings.
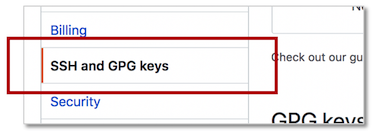
In the Settings sidebar, select the SSH and GPG Keys option.
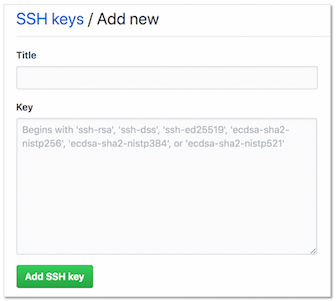
On the right hand side, select New SSH Key which will present you with an area to paste your public SSH key text into.

We need to copy to the clipboard the contents of the id_rsa_pub file we created earlier. In a console window type the following command.
pbcopy < ~/.ssh/id_rsa.pub
Now return back to the browser where your Github account is open. Give the SSH key a Title and paste the file contents into the Key field. When done, hit the Add SSH Key button. You may be prompted for your password, if so enter it and hit Confirm Password to complete this step.
You can check your connection to Github is set-up correctly by typing the following command, which should give you the message in the console window shown below.
ssh -T [email protected]

Create a Github Repository
Now that we’re all set-up with Git and Github, and we’ve set-up a folder on our local system that’s been initiliased as a Git repository - we just need to add a remote repository on Github that we can commit our local files to.
In your home page on Github, click on Repository and then New to start adding a new repository.

On the next page complete the details for the Respository name and a Description. Set the visibility to Public and initialise with a README file so you can easily add a description and notes about the repository. It’s recommended that you choose a license type too, MIT License is fairly common for open source work. When you’re done, hit the Create Respository button.
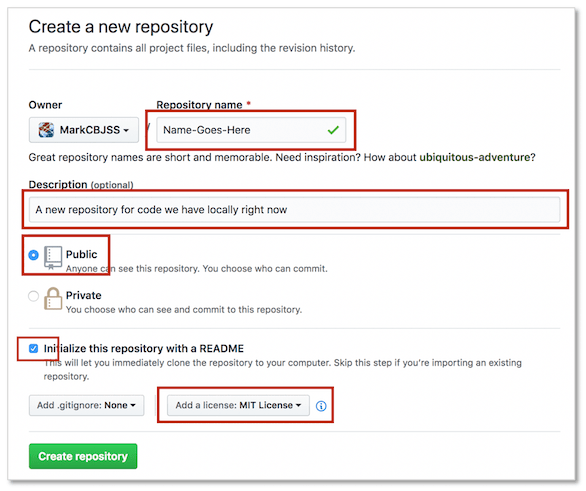
The respository will now be set-up with your readme and license files. It will also have a Github URL available to copy and use in Git when making a commit.
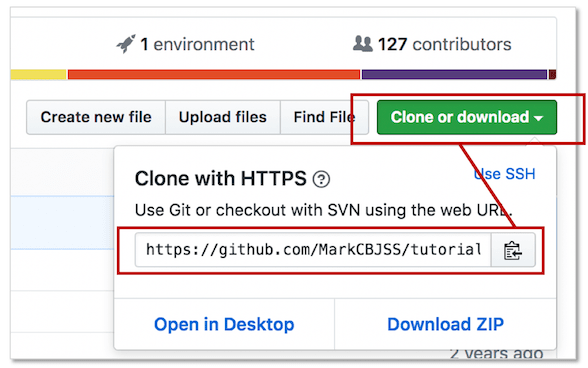
For Git to know where we want files to go when we do a git push of items in our local respository, we need to add a reference to that repository. Enter the following command in a console window and be sure to add the URL you copied from Github.
$ git remote add origin <repository-url>
The next step
Learn more about the Git Command Line.
This ends our Set-up Git and GitHub lesson. Is there something you don’t understand? Try and go through the provided resources with your coach. If you have any feedback or can think of ways to improve this tutorial send us an email and let us know.