HTTP Requests and APIs
Objectives
In this tutorial we are going to look at:
- HTTP Requests
- APIs
- JSON
- Loading API data into web pages
- Using jQuery AJAX functionality
Goal
By the end of this tutorial you will have built:
- A webpage that can retrieve information from a GitHub user
HTTP Requests
What are HTTP Requests?
HyperText Transport Protocol
Every time the browser fetches data from a server (which could be a page, an image, a script etc) it does it using HTTP. The server then sends back a response. An API is an easy way of fetching information from a remote service, in a way that a computer can understand, typically in JSON format (we’ll talk more about JSON later).
GitHub offers a simple API for viewing its current and historical server availability. Availability means whether or not the GitHub website was accessible to users and accepting traffic. If your website is down, it is not available.
You can access an API in your web browser. Pop the following into the address bar:
https://www.githubstatus.com/api/v2/summary.json
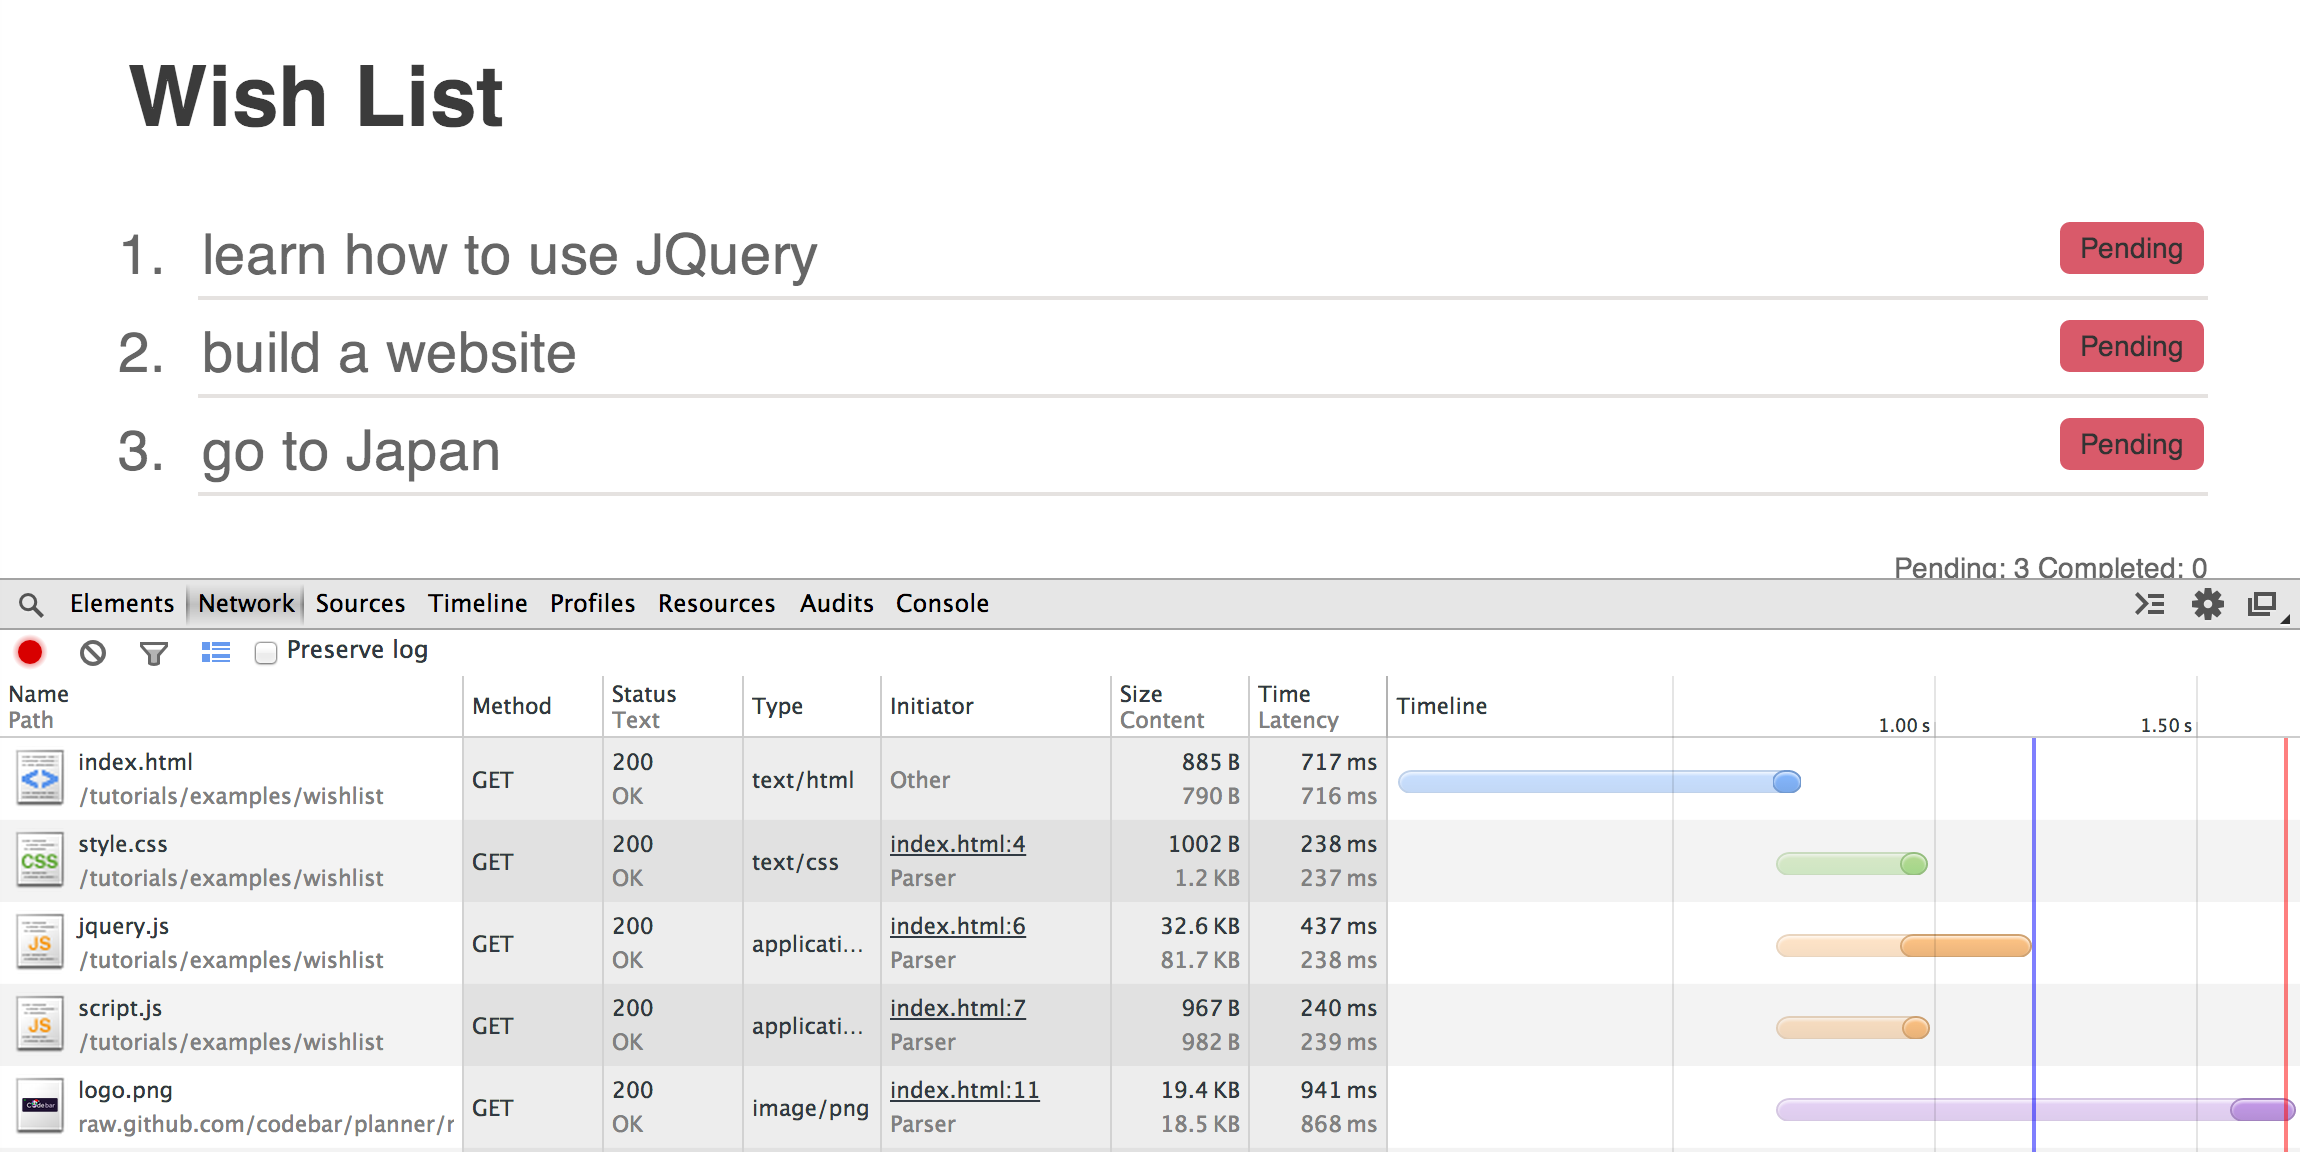
You can view all requests issued by a website by going to the Network (or Net) tab.
As part of the response, a request gives back a status code. You can use this to identify if the request was successful or not. Below is a list of the most common status codes.
| Status code | Message | Description |
|---|---|---|
| 200 | OK | Successful request |
| 304 | Not modified | The page has not been modified since we last retrieved data |
| 400 | Bad Request | The server did no understand the request |
| 404 | Not Found | The server could not find the requested resource |
HTTP Methods
There are several HTTP Methods, but in this tutorial we will primarily be using GET and POST. GET is used to request data from your specified API, whereas POST is used to send data to your specified API.
Exercise 1 - Retrieve GitHub user information
We are going to build a small application that requests information about a GitHub user - we want to show their username, information and picture.
Take a second to think about what HTTP Method we will use to retrieve this data. Is it GET or POST?
If you guessed GET congrats! Now let’s retrieve some data. See what happens when you put https://api.github.com/users/codebar into your address bar.
The response will look something like the JSON data below, which we have shortened:
{
  "login": "octocat",
  "id": 1,
  "avatar_url": "https://avatars.githubusercontent.com/u/9906?v=2",
  "gravatar_id": "",
  "html_url": "https://github.com/octocat",
  "type": "User",
  "name": "monalisa octocat",
  "company": "GitHub",
  "blog": "https://github.com/blog",
  "location": "San Francisco",
  "email": "[email protected]",
  "bio": "There once was...",
}
This data is what’s called key value pairs, meaning that the name of the field is displayed immediately before the value. As you can see, the URL for the avatar (user’s icon) is in the avatar_url field, and is https://avatars.githubusercontent.com/u/9906?v=2.
Run the same URL but with your GitHub name.
Getting started
Now Download the exercise files or clone them directly from Github https://gist.github.com/deniseyu/d1bc03b8091153b4b1a7.
First, open the HTML page supplied in the download. As you can see, there is a box to type in a username. When the user has typed in the username, they should be able to trigger the API call to GitHub by pressing <enter>.
The following code allows you to listen for a keypress on the input field, and to see if it was the <enter> key that was pressed.
$(document).ready(function() {
  $(document).on('keypress', '#username', function(event) {
    if (event.which === 13) { // check the key was <enter>
      // do something
    }
  });
});
We will need to pass the username to GitHub, so we need to extract it from the input text box. To show that we can do this - let’s first extract the data using jQuery’s val(), and log it to the console. Something like this should work:
$(document).ready(function() {
  $(document).on('keypress', '#username', function(event) {
    if (event.which === 13) { // check the key was <enter>
      var input = $(this);
      var username = input.val();

      console.log('username was: ' + username);
    }
  });
});
Now we’re ready to pass this through to GitHub. Let’s make another function, something like this:
function getGithubInfo(username) {
  var url = 'https://api.github.com/users/' + username;

  var xmlhttp = new XMLHttpRequest();
  xmlhttp.open('GET', url, false);
  xmlhttp.send();

  var data = xmlhttp.responseText;

  console.log(data);
}
XMLHttpRequest is the object we use in JavaScript to perform an HTTP or API request. Although it has XML in the name (XML is a data format), it can be used for other formats such as JSON, which is what we’re using here.
We create an XMLHttpRequest object and then call the open method, passing three arguments to the GitHub API.
- the
method- in this case,'GET' - the
url- in this case the url eg https://api.github.com/users/codebar - whether or not to run this request synchronously or asynchronously.
In this case, we’ll specify synchronously by passing false. This means the browser will wait for the call to the GitHub API to finish before continuing.
Making requests synchronously is not good practice, but we’re doing it for now to keep things simple. Your browser may show a deprecation warning but the request will still work. We’ll move onto asynchronous requests further down once we have the basics of APIs covered.
You can now call getGithubInfo, passing the username, from the keypress block above. That will log the data to the console. Next, we need to pass this back to the web page via the DOM.
Handling a successful request
Our getGithubInfo method will return the response from the server, including the HTTP status:
function getGithubInfo(username) {
  var url = 'https://api.github.com/users/' + username;

  var xmlhttp = new XMLHttpRequest();
  xmlhttp.open('GET', url, false);
  xmlhttp.send();

  return xmlhttp;
}
If the request was successful, the status code will be 200. If we check that this code is 200, we know we can proceed to reading the data.
Create a new method called showUser() that handles the response from the API, and performs this check on the xmlhttp variable we just returned from our getGithubInfo method. Once the keypress block has called getGithubInfo, it should pass the result to showUser.
function showUser(xmlhttp) {
  if(xmlhttp.status === 200) {
    // show the user details
  } else {
    // show an error
  }
}
Once we’ve checked the status, we need to decode the data which is stored in xmlhttp.responseText. It’s in JSON format, which is a string, so we need to turn that into a native JavaScript object. We do this using JSON.parse(data).
function showUser(xmlhttp) {
  if(xmlhttp.status === 200) {
    // show the user details
    var json = xmlhttp.responseText;
    var user = JSON.parse(json);
  } else {
    // show an error
  }
}
Now the user variable will contain all the information we need to update the page. Finish the function to:
- Display the user’s Github id in
#profile h2-<user login> + ' is GitHub user #' + <user id> - Add a link to the user’s Github profile in
#profile .information. The link should have a classprofile - Add an image in
#profile .avatar. To do that, you can use theavatar_urlfrom the response.
Handling a failed request
First, let’s make sure we handle any requests that have failed.
Have a look in the status codes. There is only one response code for a successfully request, anything else should be classed as a failure.
When we have a failing request, we want to change the html of $('#profile h2') to No such user!
Try this out using username: iamcodebar (or if someone registered this, make up a random string)
Bonus!
Well done, you’ve finished! For a bonus, switch your getGithubInfo method to run asynchronously - your coach can help you.
Coach… explain the difference between synchronous and asynchronous requests. There’s a good explanation on Mozilla Developer Network (MDN)
Further Learning
If you want to continue your learning on API’s, then watch this video with Kevin Lewis over on our YouTube, where he’ll send himself a text message using the Vonage API.
This ends our HTTP Requests and APIs tutorial. Is there something you don’t understand? Try and go through the provided resources with your coach. If you have any feedback, or can think of ways to improve this tutorial send us an email and let us know.